I wish I was that confident and skilled to blow everyones mind with detail, but I think I'm too impatient for that!
31 January 2010
Delissilinks
I wish I was that confident and skilled to blow everyones mind with detail, but I think I'm too impatient for that!
28 January 2010
Nigella's Badenjan Dip

I was watching Nigella Bites the other day on Food TV and she made this dip with eggplant. I've never had much success with eggplants/aubergine so I wanted to give this a try as it looked so delicious when she made it. Nigella has the ability to make anything look quite delightfully yummy!
 Badenjan Dip
3 small eggplants or enough to make 1 1/4 cups when roasted, pulped and sieved. (I actually used two large as I couldn't find small ones at the supermarket)
2 tablespoons olive oil (not extra virgin)
1 large onion, finely diced
3 fat cloves, minced or grated
Salt and freshly ground black pepper
1 cup greek yogurt
1/4 teaspoon saffron threads, soaked in 2 tablespoons warm water
2 tablespoons chopped fresh mint, to garnish
2 tablespoons pine nuts, toasted, to garnish
Dribble extra-virgin olive oil, to garnish
Directions:
Preheat the oven to 200 degrees C
Prick the eggplants with a fork and then put them on a baking sheet and cook for 45mins to 1hour, until soft to the touch. Allow to cool before peeling and mashing them, then leave the pulp to drain in a sieve.
Heat the oil in a pan and add the onion and garlic. Cook until golden and then add the drained eggplant mush, cooking it with the onion and garlic for about 5 minutes over a gentle heat, stirring frequently. Take off the heat and turn into a bowl to cool and season with salt and pepper.
Add the yogurt to the cooled mixture together with the saffron in now golden water, stirring together well. Turn into a bowl and sprinkle over the mint, toasted pine nuts and a dribble of oil.
Serve with fresh pita or toasted as crisps. This makes an excellent creamy but tangy dip with all the flavours showing up and working together very well. An excellent starter for an exotic meal. The garlic and onion are strong so make sure you aren't going on a hot date afterward!


You can also find it here on the foodnetwork.com
Delissilinks

Yes, well the big news is New Zealand's Hottest Home Baker airs next Thursday night at 8.30pm on TV3, and if you miss that there is a repeat screening on Monday on Food TV at 6.30pm. Finally! I'm really nervous and excited all at once.
My bro Eddie, over in ole Blighty, is so excited about this that he told his workmates and they did this on their blog. Poor Colin. He is truly a lovely man, and his hair looked fabulous on set.
See?

So stay tuned to the telly. The other thing I'm excited about is MasterChef NZ on TV1 starting next Wednesday. I've really been looking forward to that and am SO glad its not clashing with my show because I don't have MySky yet!
27 January 2010
Daring Bakers - Graham Wafers and Nanaimo Bars
I was very keen on trying these, especially as I am interested in having some gluten free recipes in my repertoire. So many people I know are on gluten free diets and I would love to be able to bake for them too! The other reason I was keen is I had never heard of them before, as well as not knowing what graham crackers actually are, despite having heard about them.
Here is my attempt at the graham wafers.
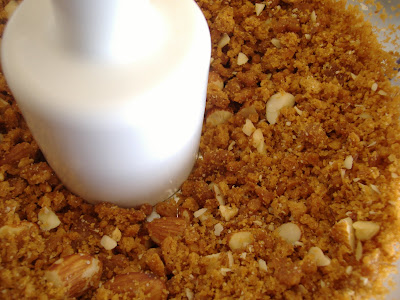
 Hmm not so waferlike; more like thick and gooey but they had a beautiful flavour of honey and whizzed up perfectly in the food processor as the base for the bars. I had trouble rolling it out because the mixture was so soft and gooey (thanks to it being the middle of summer), and I ran out of rice flour to help me out. So I put the mixture between two sheets of parchment paper and rolled it, then chucked it in the freezer for a while to harden so I could peel the top parchment sheet off, and then cut them up! Voila!

Making the bars was easy. I whipped up the middle layer quickly and added a wee bit of peppermint essence to the mix as I though it a rather boring flavour, and then melted the chocolate. I added oil into the chocolate instead of butter purely because it saved time and I had such a small amount. It still sets perfectly.
These are HUGELY sweet due to the middle layer but the base layer is delicious with the coconut and almonds and I decided this would be a good base for any gluten free slice so I am excited to use my leftovers for something else!

 Here's the recipe:
Variations allowed:
• Although I highly recommend using gluten-free flours, as the chemistry is very interesting and the end result can be amazing, you are allowed to use wheat.
• If making them gluten-free, no wheat, barley, rye, triticale, kamut, spelt, durum, semolina, or other gluten containing ingredients may be used. Removing those ingredients ensures it is safe for those with Celiac Disease and other health issues where gluten causes problems. If you do plan on serving this to someone on a gluten-free diet, also ensure no cross-contamination occurs.
Preparation time:
• Graham Wafers: 30 to 45 minutes total active prep, 2 ½ hours to overnight and 45 minutes inactive prep.
• Nanaimo Bars: 30 minutes.
Equipment required:
• Food Processor
• Bowls
• Parchment paper or silpats
• Cookie sheets
• Double boiler or pot and heatproof bowl
• 8 by 8 inch square pan
• Hand mixer or stand mixer (You may use a wooden spoon, but this makes it much easier!)
• Saucepan
For Gluten-Free Graham Wafers
Ingredients
1 cup (138 g) (4.9 ounces) Sweet rice flour (also known as glutinous rice flour)
3/4 cup (100 g) (3.5 ounces) Tapioca Starch/Flour
1/2 cup (65 g) (2.3 ounces) Sorghum Flour
1 cup (200 g) (7.1 ounces) Dark Brown Sugar, Lightly packed
1 teaspoon (5 mL) Baking soda
3/4 teaspoon (4 mL ) Kosher Salt
7 tablespoons (100 g) (3 ½ ounces) Unsalted Butter (Cut into 1-inch cubes and frozen)
1/3 cup (80 mL) Honey, Mild-flavoured such as clover.
5 tablespoons (75 mL) Whole Milk
2 tablespoons (30 mL) Pure Vanilla Extract
Directions:
1. In the bowl of a food processor fitted with a steel blade, combine the flours, brown sugar, baking soda, and salt. Pulse on low to incorporate. Add the butter and pulse on and off, until the mixture is the consistency of a coarse meal. If making by hand, combine aforementioned dry ingredients with a whisk, then cut in butter until you have a coarse meal. No chunks of butter should be visible.
2. In a small bowl or liquid measuring cup, whisk together the honey, milk and vanilla. Add to the flour mixture until the dough barely comes together. It will be very soft and sticky.
3. Turn the dough onto a surface well-floured with sweet rice flour and pat the dough into a rectangle about 1 inch thick. Wrap in plastic and chill until firm, about 2 hours, or overnight.
4. Divide the dough in half and return one half to the refrigerator. Sift an even layer of sweet rice flour onto the work surface and roll the dough into a long rectangle, about 1/8 inch thick. The dough will be quite sticky, so flour as necessary. Cut into 4 by 4 inch squares. Gather the scraps together and set aside. Place wafers on one or two parchment-lined baking sheets. Chill until firm, about 30 to 45 minutes. Repeat with the second batch of dough.
5. Adjust the rack to the upper and lower positions and preheat oven to 350 degrees Fahrenheit (180 degrees Celsius).
6. Gather the scraps together into a ball, chill until firm, and reroll. Dust the surface with more sweet rice flour and roll out the dough to get a couple more wafers.
7. Prick the wafers with toothpick or fork, not all the way through, in two or more rows.
8. Bake for 25 minutes, until browned and slightly firm to the touch, rotating sheets halfway through to ensure even baking. Might take less, and the starting location of each sheet may determine its required time. The ones that started on the bottom browned faster.
9. When cooled completely, place enough wafers in food processor to make 1 ¼ cups (300 mL) of crumbs. Another way to do this is to place in a large ziplock bag, force all air out and smash with a rolling pin until wafers are crumbs.
Nanaimo Bars
Ingredients:
For Nanaimo Bars — Bottom Layer
1/2 cup (115 g) (4 ounces) Unsalted Butter
1/4 cup (50 g) (1.8 ounces) Granulated Sugar
5 tablespoons (75 mL) Unsweetened Cocoa
1 Large Egg, Beaten
1 1/4 cups (300 mL) (160 g) (5.6 ounces) Gluten Free Graham Wafer Crumbs (See previous recipe)
1/2 cup (55 g) (1.9 ounces) Almonds (Any type, Finely chopped)
1 cup (130 g) (4.5 ounces) Coconut (Shredded, sweetened or unsweetened)
For Nanaimo Bars — Middle Layer
1/2 cup (115 g) (4 ounces) Unsalted Butter
2 tablespoons and 2 teaspoons (40 mL) Heavy Cream
2 tablespoons (30 mL) Vanilla Custard Powder (Such as Bird’s. Vanilla pudding mix may be substituted.)
2 cups (254 g) (8.9 ounces) Icing Sugar
For Nanaimo Bars — Top Layer
4 ounces (115 g) Semi-sweet chocolate
2 tablespoons (28 g) (1 ounce) Unsalted Butter
Directions:
1. For bottom Layer: Melt unsalted butter, sugar and cocoa in top of a double boiler. Add egg and stir to cook and thicken. Remove from heat. Stir in crumbs, nuts and coconut. Press firmly into an ungreased 8 by 8 inch pan.
2. For Middle Layer: Cream butter, cream, custard powder, and icing sugar together well. Beat until light in colour. Spread over bottom layer.
3. For Top Layer: Melt chocolate and unsalted butter over low heat. Cool. Once cool, pour over middle layer and chill.
-------------------------------
Additional Information:
These bars freeze very well, so don’t be afraid to pop some into the freezer.
The graham wafers may be kept in an airtight container for up to 2 weeks. Mine lasted about that long.
If making the graham crackers with wheat, replace the gluten-free flours (tapioca starch, sweet rice flour, and sorghum flour) with 2 ½ cups plus 2 tbsp of all-purpose wheat flour, or wheat pastry flour. Watch the wheat-based graham wafers very closely in the oven, as they bake faster than the gluten-free ones, sometimes only 12 minutes.
For the Nanaimo Bars, if making with wheat, replace the gluten-free graham wafer crumbs with equal parts wheat graham wafer crumbs
25 January 2010
I'm 30 now!
This is what I made, and I didn't take proper photos as I misplaced my camera and this is the best I could get...so I jazzed it up with Saved by the Bell type naff 80's background.
The top tier is lemon, middle is banana with dark chocolate ganache filling and the bottom is a beautiful carrot cake with cream cheese filling. All topped with fondant. This was so much fun to make!
I also did 70 cupcakes plus some gluten free chocolate chip ones, which sadly didn't get any photos at all, but I am told they were delicious. And then the pics of the ones below are blurry so I'm a bit gutted after all the work I did on them!
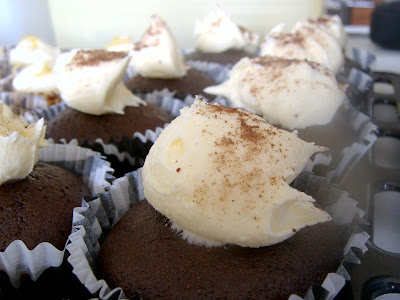

The cupcakes are choc mud with a peppermint buttercream and the other ones are lemon with a lemon buttercream. All served in these great little cupcake wrappers in zebra and leopard print from Kiwicakes!
It was so great to have my family and friends all together for a good party. My huge thanks to everyone who helped me out and just turned up to have a good time!! Big thanks to Az and Rachel for the music set up, and another big thanks to Rachel H for the awesome vodka jellies, even my mother-in-law had one! Massive thanks also to Emma, Becs, Sani and mum and dad for help with food, decorations and music assistance. You guys are all totally rad!
So now I can relax and enjoy my week with my lovely Amy who flew out from Brisbane especially.
23 January 2010
Cute factor!

The reason my posts have been few and far between in the new year is because I've spent half my time organising my 30th birthday party. More to come on that in the next post but I just wanted to put this one up.
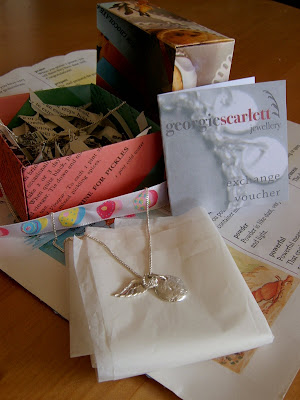
Yesterday was my actual birthday and this gift from my sister in law was too cute not to share!
Georgie Scarlett Jewelry is a shop with pieces designed by Sandra Gunn and is based in Devonport. This is how she wrapped the necklace! My sister in law told her I love baking so she made up this cute box for the necklace....out of recipes and pictures of cakes.
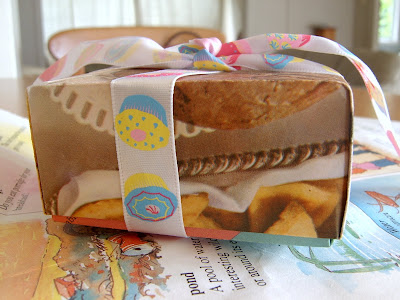
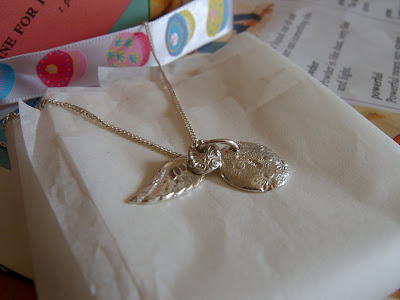
With a cupcake ribbon...
and the final part is so clever!

She uses pages from childrens books to make a paper bag, sealed with a sticker! Love love love it! Ingenious, cute, almost homemade feel but super duper cool.
Check out her website or her blog or her shop in Devonport - Shop 5, 13 Victoria Road.
18 January 2010
Gluten Free Brownies

These are deliciously moist and rich brownies made in the microwave. A great idea for a quick dessert if you are entertaining people on the spur which we love to do. And especially handy as I have 3 very good friends who are on gluten free diets.
This is served with Killinchy Gold Manuka Honey and Almond ice cream.
Gluten Free Microwave Brownies:
1/2 cup margarine (or butter)
1 cup sugar
2 eggs
1 teaspoon vanilla
3/4 cup gluten free baking mix
1/4 teaspoon baking powder
1/2 cup cocoa
1/2 cup chopped nuts
1/2 cup chopped chocolate (I used Cadbury's Energy bar)
Melt margarine/butter on high for 45secs in a microwave proof bowl. Add sugar and eggs and vanilla and beat till creamy. Mix in dry ingredients until just blended.
Spread evenly into baking dish and microwave on medium for 8-10 minutes until the top appears dry and springs back when touched.
Leave to cool and cut into bars. What I did last night was serve it hot with ice cream for a lovely hot treat as the chocolate was still all gooey. YUM!
Can be served with a sprinkling of chopped nuts on top too. Like Katie did with hers:

13 January 2010
In Memory: Militia 1993-2010

I never knew I could ever love an animal so much.
When I met Owen he had this crazy little Staffordshire Bull Terrier who used to jump into peoples' cars if they left their door open, didn't matter who it was. She loved a good car ride. When we married she was part of the package.
 Me and Milita in 1998.
Owen found her in 1993 as a puppy running along Cheltenham Beach, took her to the pound but no one claimed her, so he kept her. And she never grew up, she was always a puppy. And a roamer; even with a high fence around the garden she still jumped over and ran away, mostly to North Head but we've picked her up in Mairangi Bay, Glenfield, Henderson and just about all over Devonport.

She had a real knack of making friends with dog lovers on her trips and everyone who took her home and fed her before ringing us to collect her were all just awesome people and we are forever thankful. Even the time she ran to Devonport and stupidly decided the Clydesdale horses that take all the tourists on the Devonport circuit looked like a good lunch but got kicked and thrown against the ferry building and broke her leg badly. She was picked up by the locals and taken to the vet. That was an expensive bill. One of many!
She was so gentle and patient with our 3 kids. Every time we brought a new child home from the hospital we would bring her over to meet them, she'd give a little lick and a sniff, then trot off. Apart from being a bit clumsy and sometimes sitting or walking on a child she was always gentle, even when having her tail pulled or being sat on, she would just put up with it. She loved being around the kids and having their company.
 She was most happy when she was around people, and although she annoyed many with her constant licking, she was as loyal and as sweet a dog as you could get. Certainly there were many frustrations, as you get when you have a pet. Like the time she snuck into my Easter supplies and ate all the carefully handmade chocolate packages I made up for the family. She ate them on our bed. And was sick for days.
Her last escapade was only a few months ago when I returned from being out. She had escaped out the garden for the gagillionth time. Knowing she wouldn't get far, and being an old doggie I was quite worried and spent the day searching for her in the rain. By 4pm I gave up only to find her on the back deck having been delivered by the neighbour. She had escaped to his sons bed and spent the day sleeping on it. I was so relieved and embarrassed I made him some cookies!
At the age of 17 she was ready for a long rest and this week, after a few weeks of being very unwell and no longer making noise, wagging her tail, licking our feet and even running away she gave up on life. Militia will be greatly missed. There was no other dog like her. Thankfully!
Rest in peace sweet doggy!
Home made Pizza

Home made pizza bases beat store bought hands down, any day.
I was given a bread maker by my mother in law a few years back and I can't live without it. It makes making bread so much easier basically because I'm lazy busy and love to chuck all the ingredients in and walk away until the beeper sounds! This is my recipe for bread maker pizza dough, which the kids all love and is a regular feature in the weekends.
Pizza Dough
¾ cup water
2 tablespoons oil
2 cups high grade flour
½ teaspoon sugar
½ teaspoon salt
1 ½ teaspoons yeast
Add water & oil first, add dry ingredients then make a well and add the yeast.
Put pan in bread maker and put on dough setting.
When done leave the dough in the bread maker for about ½ hr-40mins, when it’s risen I usually knead it and roll it to shape then add the toppings and cook. It takes about 20mins in a 180 deg Celsius oven.
07 January 2010
More summer sweets

Nothing says summer more than barbecues with friends and good food.
Here's two desserts mum made last night. Both were incredibly delicious.
Tiramisu...really really rich. The kids weren't allowed this one:
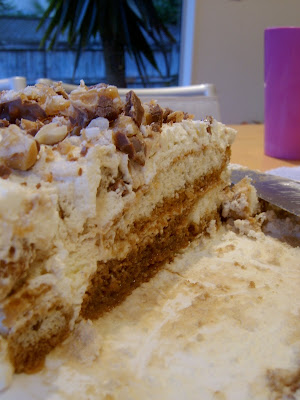
and a Nigella recipe to make icecream cake:
2 ltr vanilla ice cream blended with chocolate bits (milk and dark) and crushed cameo creams and crunchie bars then mum folded frozen berries into before pouring into a springform tinned lined with glad wrap and freezing again. Served with a hot butterscotch sauce.
So delicious I had to go back for a large second helping.


I love summer!
04 January 2010
Summer sweets
Having relaxed this whole week after a hectic December I figured it was time to get back in the kitchen. I hope you all had a fabulous Christmas and New Years, we certainly have been treated to lovely weather here in Auckland anyway! Also exciting this weekend the first adverts for New Zealand's Hottest Home Baker have been showing on Food TV much to the kids excitement! They (and I) can't wait for it to air!
First up banana cupcakes. Had a few spotty bananas in the fruit bowl only about a day after buying them thanks to the weather. The fruit flies were hanging around expectantly. So I made a batch of banana muffins with a recipe I was sent from my Aunt Susie in Canada and comes from the Canadian Living (May 09) magazine. The frosting that went on them was also with this recipe, however as you will see from the photos, I'm not sure this frosting will be making its way back to my kitchen in a hurry! I'll print both the recipes below.

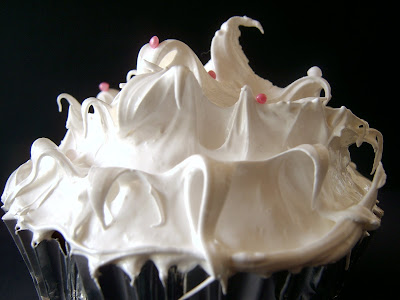 The frosting is called 7 Minute Frosting and I figured is a good way to use left over egg white, and I am also a sucker for any meringue sticky gooey stuff but this was taking it a notch further. It's like a gluey white sweet paint. Too sweet and gooey and I cannot imagine EVER serving this to a bunch of kids at a party. Imagine the mess!!! Any cupcake that requires an adult having to wash their face after eating is not something I wanna eat. It also took away the taste of the cupcake, which is a lovely, moist, banana-ry and fluffy cupcake recipe. I think it would do much better with a cream cheese, or chocolate icing.
Here's the result of the troops eating this, I had to send them outside and I'm glad I did! And then I realised I had forgotten to add the water to the recipe! So who knows if its supposed to be any different - perhaps not so thick? Oops!


 Yes Katie was the first to drop hers. Not much of a recovery from this one...which is no matter as kids never seem to eat the actual cake anyway.
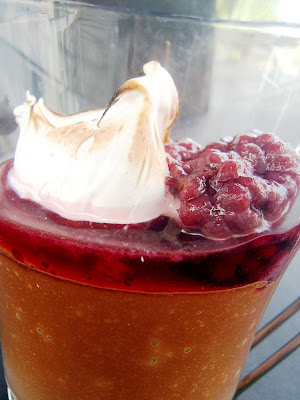
Second up is an old favourite from the Jo Seagar Easy Peasy Summer Entertaining cookbook. These ones always surface about this time of year. This is a rich and delicious summer dessert - Espresso Cups of Chocolate Cream. Recipe also below.
I love this recipe for a few reasons but mostly because Jo makes it soooo easy, and it's really really rich in chocolate and nothing beats chocolate in my estimation! Also it can be varied so instead of using dark chocolate you can use white or milk, and Jo even suggest chocolate peppermint creams or Caramellow chocolate! Hmm mm. Are you getting hungry even thinking about that or what?

I always like serving mine with some tart berries (goes beautifully with chocolate), in this case I didn't have any fresh ones on hand so I used some canned blackberries, still delicious. You can also make this as one large serving but I do prefer the wee cup sizes. In these ones I plonked a bit of the dreaded 7 minute frosting I used from the leftover egg whites, and I don't think I'll do it again. A dollop of cream is much nicer. But it gave me an excuse to try out my new blowtorch! Hehe.
Right, now for the recipes:
Banana Buttermilk Cupcakes
1/2 cup butter, softened (I used 125g)
3/4 cup packed brown sugar
1 egg
3/4 cup mashed banana
1 tsp vanilla
1 1/4 cup plain flour
1/2 tsp baking powder
1/2 tsp baking soda
1/4 tsp salt
1/2 cup buttermilk (I didn't have any so I added cider vinegar into regular bluetop milk, works just as well. You can also use white vinegar)
In a large bowl beat butter with sugar until fluffy; beat in egg. Beat in banana and vanilla.
In a separate bowl, whisk together the flour, baking powder, baking soda and salt. Stir into butter mixture alternately with buttermilk. Spoon into paper-lined or greased muffin tray.
Bake 180 deg Celsius for 20-25mins. Makes 12.
7 Minute Frosting
2/3 cup caster sugar
2 egg whites
1/4 tsp cream of tartar
pinch of salt
1/2 tsp vanilla
1/4 cup water
In heatproof bowl whisk together the water (yes that's right, the part I forgot), sugar, egg whites, cream of tartar and salt. Set bowl over saucepan of simmering water; beat constantly until mixture holds stiff peaks (5-7 mins, hence the name of the frosting).
Remove from pan and beat until frosting is cooled, about 2 mins. Beat in vanilla. This makes approx 3 cups, enough for 12 cupcakes.
Espresso Cups of Chocolate Cream
Serves 4-8 depending on the size. I made 6.
300ml cream
1x250g packet of chocolate bits
3 egg yolks
3 tablespoons liqueur (e.g Cointreau or Kahlua), vanilla or peppermint essence, or strong sweetened espresso coffee.
Heat the cream until just about to boil. Throw everything in a blender and run the machine until the racket stops. Pour into little espresso cups or liqueur glasses and chill for at least 3 hours, preferably overnight.
Happy New Year to you all! I am sure 2010 is going to be full of fun!

